veraPDF Policy Checking
veraPDF can also be used to perform additional checks beyond those mandated in the PDF/A specifications. Users can define custom checks for PDF documents using the XML Schematron syntax.
The veraPDF policy checker doesn’t parse PDF documents directly. Instead it processes the machine readable report output generated by the PDF/A Validator and Feature Extractor. This means that the policy checker depends upon having the correct information in the report.
You can read more about feature extraction on this site, there’s also instructions for configuring feature extraction.
Schematron Syntax
Schematron allows you to express constraints, known as assertions, about data in XML documents. It is designed for quality assurance, expressing business rules and XML validation. The schematron standard is deceptively simple, defining only five elements. It’s power lies in the more complex standards that it uses:
- XPath to define the elements of interest in an XML document; and
- XQuery to write queries for XML data.
Schematron assertions allow to verify values of some specificPDF features such as metadata values, image compression, color spaces and fonts, and a lot of other data. The complete list of features can be found at on this site.
This simple schema document, that’s also a veraPDF policy document, shows all five schematron elements:
<sch:schema xmlns:sch="http://purl.oclc.org/dsdl/schematron" queryBinding="xslt">
  <sch:pattern name="Check compressions used in the document">
    <sch:rule context="/report/jobs/job/featuresReport">
      <sch:report test="lowLevelInfo/filters/filter/@name = 'CCITTDecode'">CCITT compression is OK</sch:report>
      <sch:assert test="lowLevelInfo/filters/filter/@name = 'DCTDecode'">JPEG compression is not OK</sch:assert>
    </sch:rule>
  </sch:pattern>
</sch:schema>
We’ll look at the elements in more detail as we work through some examples.
Policy how-tos
We’ll provide links to prepared configuration and policy example files. Each
pair of links will point to a schematron file called <example-name>.sch and an
appropriate features.xml file, which should be used to overwrite your
<verapdf-install-path>/config/features.xml file.
Fonts
We’ll work through two examples, one to disallow a particular font the other ensuring that documents contain only a certain font.
In order to configure the feature extractor to generate font data please
download this features config file and replace the current
<verapdf-install-path>/config/features.xml file.
Disallow font by name
Our first example will show how to check that an unwanted font does not appear in our document. The schematron file is quite simple:
<sch:schema xmlns:sch="http://purl.oclc.org/dsdl/schematron" queryBinding="xslt">
  <sch:pattern name="Disallow Adobe Gothic fonts.">
    <sch:rule context="fonts/font/fontDescriptor">
      <sch:assert test="not(contains(fontName,'AdobeGothicStd-Bold'))">Adobe Gothic fonts are not allowed.</sch:assert>
    </sch:rule>
  </sch:pattern>
</sch:schema>
You can download a copy here for testing. A quick explanation of the key elements:
<sch:rule context="fonts/font/fontDescriptor">sets up the XPath context for any enclosed<assert>and<report>elements. We’ve short handed the context, the full path to the<fontDescriptor>element is/report/jobs/job/featuresReport/documentResources/fonts/font/fontDescriptor. By omitting the starting/we can use a relative pattern that is shorter and still unique enough for our purposes.<sch:assert test="not(contains(fontName,'AdobeGothicStd-Bold'))">tests that any<fontName>elements do not contain valueAdobeGothicStd-Bold, the name of the font we want to disallow. Note that we can not simply usetest="fontName != 'AdobeGothicStd-Bold'", as PDF fonts may be subset, and in this case the font name contains a random six character prefix such as “UMBSME+AdobeGothicStd-Bold”.
If you’ve downloaded the schematron file to your veraPDF installation directory and configured the feature extractor to gather font data, you can issue the command:
verapdf --policyfile font-disallowed.sch corpus/veraPDF-corpus-staging/PDF_A-1b/6.3\ Fonts/6.3.3.1\ General/veraPDF\ test\ suite\ 6-3-3-1-t01-pass-a.pdf
We’ll not show the entire output, the key section is the policy report, shown below:
<policyReport passedChecks="0" failedChecks="2" xmlns:vera="http://www.verapdf.org/MachineReadableReport">
  <passedChecks/>
  <failedChecks>
    <check status="failed" test="not(contains(fontName,'AdobeGothicStd-Bold'))" location="/report/jobs/job/featuresReport/documentResources/fonts/font[1]/fontDescriptor">
      <message>Adobe Gothic Bold fonts are not allowed.</message>
    </check>
    <check status="failed" test="not(contains(fontName,'AdobeGothicStd-Bold'))" location="/report/jobs/job/featuresReport/documentResources/fonts/font[2]/fontDescriptor">
      <message>Adobe Gothic Bold fonts are not allowed.</message>
    </check>
  </failedChecks>
</policyReport>
The <policyReport> elements show that there were no passed checks and two
failed checks for this PDF document.
Ensuring a named font is present
Our next example will show how to check that only a particular font appears in our document. Once again we’ll show the schematron file:
<sch:schema xmlns:sch="http://purl.oclc.org/dsdl/schematron" queryBinding="xslt">
  <sch:pattern>
    <sch:rule context="fonts/font/fontDescriptor">
      <sch:report test="contains(fontName,'AdobeGothicStd-Bold')">Adobe Gothic Bold is present.</sch:report>
      <sch:assert test="contains(fontName,'AdobeGothicStd-Bold')">Only Adobe Gothic Bold fonts are allowed.</sch:assert>
    </sch:rule>
  </sch:pattern>
</sch:schema>
You can download a copy here for testing:
verapdf --policyfile single-font.sch corpus/veraPDF-corpus-staging/PDF_A-1b/6.3\ Fonts/6.3.3.1\ General/veraPDF\ test\ suite\ 6-3-3-1-t01-pass-a.pdf
This time the policy report shows to passed checks and no failed checks, confirming that the document only contains the desired font:
<policyReport passedChecks="2" failedChecks="0" xmlns:vera="http://www.verapdf.org/MachineReadableReport">
  <passedChecks>
    <check status="passed" test="contains(fontName,'AdobeGothicStd-Bold')" location="/report/jobs/job/featuresReport/documentResources/fonts/font[1]/fontDescriptor">
      <message>Adobe Gothic should be present.</message>
    </check>
    <check status="passed" test="contains(fontName,'AdobeGothicStd-Bold')" location="/report/jobs/job/featuresReport/documentResources/fonts/font[2]/fontDescriptor">
      <message>Adobe Gothic should be present.</message>
    </check>
  </passedChecks>
  <failedChecks/>
</policyReport>
Information Dictionary Metadata
Next we’ll look at enforcing policy for metadata in the PDF Information Dictionary. The Information Dictionary is a set of key value pairs used to record document metadata. A feature report might look like this, although these are test values:
<informationDict>
  <entry key="Title">Test title</entry>
  <entry key="Author">veraPDF Consortium</entry>
  <entry key="Subject">Test description</entry>
  <entry key="Keywords">TEST KEYWORDS</entry>
  <entry key="Creator">veraPDF Test Builder</entry>
  <entry key="Producer">veraPDF Test Builder 1.0 </entry>
  <entry key="CreationDate">2015-03-10T17:19:21.000+01:00</entry>
  <entry key="ModDate">2015-03-10T17:19:21.000+01:00</entry>
</informationDict>
This schematron test ensures that a Title element is present:
<sch:schema xmlns:sch="http://purl.oclc.org/dsdl/schematron" queryBinding="xslt">
    <sch:pattern>
        <sch:rule context="featuresReport/informationDict">
            <sch:assert test="count(entry[@key='Title']) > 0">Title is present.</sch:assert>
        </sch:rule>
    </sch:pattern>
</sch:schema>
You’ll need to ensure that the feature extractor is configured to report the info dictionary metadata, this features.xml file will do the trick. You can download the schematron rule here.
In this example we’ll use the GUI to run the policy check. You can configure the feature extractor from the Features Config menu. You MUST have the Information Dictionary item checked:

You’ll need to select the Policy option from the report dropdown menu
which will enable the “Choose Policy” button and you’ll be able to load
the schematron policy. You’ll then need to
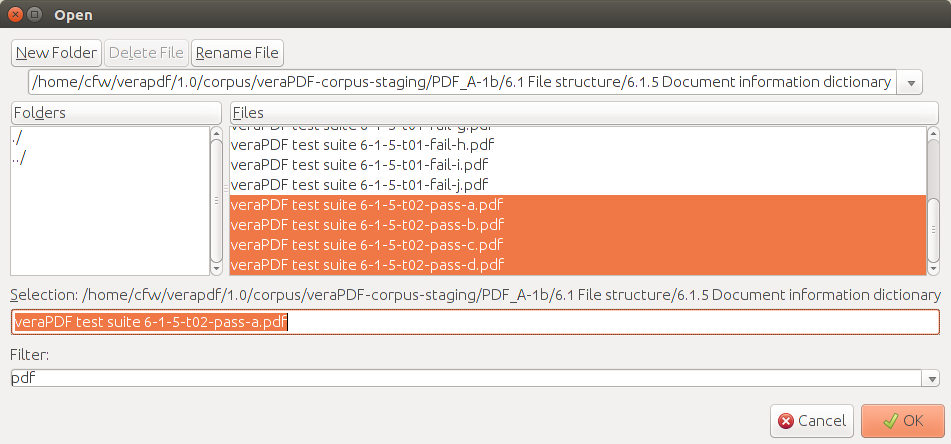
press the “Choose PDF” button to select the PDF files to check. Navigate to this
corpus subdirectory veraPDF-corpus/PDF_A-1b/6.1 File structure/6.1.5 Document
information dictionary and select the 4 pass case files at the bottom of the list
veraPDF test suite 6-1-5-t02-pass-a.pdf to veraPDF test suite 6-1-5-t02-pass-d.pdf:

Now press the “Execute” button and view the
HTML report, this is a PDF version to see that veraPDF
test suite 6-1-5-t02-pass-d.pdf has no title. The full details are in the
XML Report.
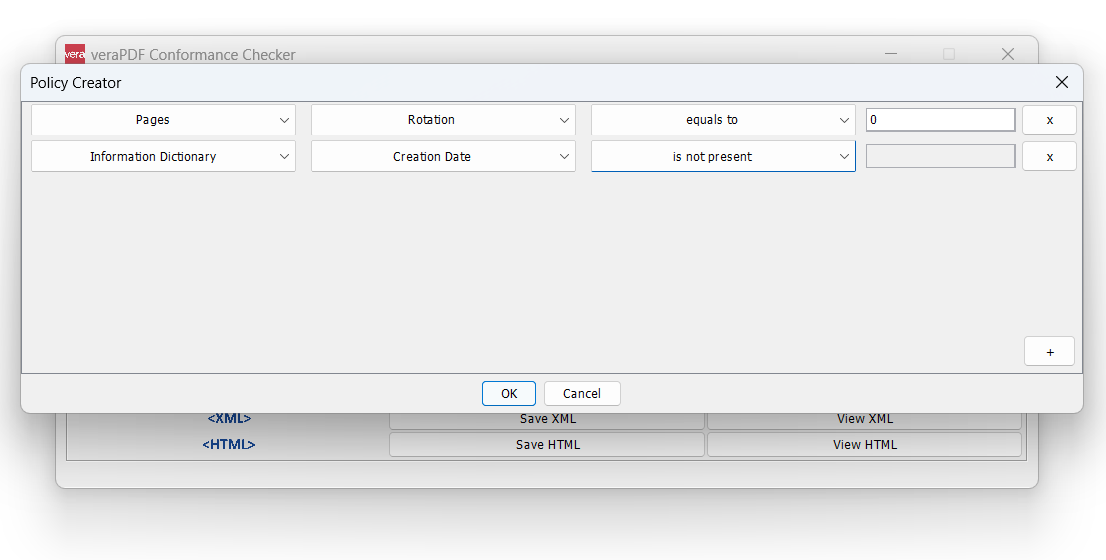
GUI for creating Policy files
GUI application contains a visual Policy Creator wizard helping to build most common policy checks. The Policy Creator is available from the GUI menu “Configs->Policy Config”:

The designed policy is then saved as a Schematron file that is also set as a current policy in the main GUI dialog.